
How to Cut and Prepare Your Hair for a Custom Wig
- Hairline Illusions

- Feb 1, 2023
- 5 min read
How to cut hair for donation?
Making a wig from your own hair is a meaningful decision. Whether you are preparing for medical treatment, preserving your hair before a major life change, or donating to a loved one, proper preparation makes all the difference in the final result.
After decades of working with client-supplied hair, we have seen what works and what leads to disappointment. This guide covers everything you need to know before you make that cut.

Understanding Hair Requirements
A full custom wig requires approximately 300 grams (8 to 10 ounces) of hair to provide complete coverage. Most people only have 40 to 150 grams on their head. This means a single harvest typically falls short of what is needed for a high-density wig.
When sectioned properly, one head of hair yields 4 to 6 ponytails. Because ponytails vary in length, texture, and thickness, it often takes hair from 2 to 4 people, or 10 to 30 ponytails total, to complete a single wig.
If you prefer a lighter, more natural density, less hair is required. Your wig maker can assess your harvest and advise whether supplemental hair is needed.

The Sectioning Method
Proper sectioning is critical. Pulling all your hair into one ponytail results in a loss of up to four inches because the inner layers are shorter than the outer layers. Sectioning the hair into multiple ponytails preserves maximum length and maintains cuticle alignment.
We recommend dividing the hair into 4 to 6 sections based on scalp region:
Front Hairline
Crown
Occipital (back of head)
Sides (left and right)
Nape
Each section should be secured tightly at the root end with multiple rubber bands placed 2 to 3 inches apart. This keeps the hair bundled and maintains the root-to-tip direction, which is essential for preventing tangling in the finished wig.

Labeling Your Sections
Label each ponytail by scalp area. Different regions of the head have subtle variations in texture and density. When your wig maker knows where each bundle originated, they can place the hair strategically for the most natural result.
Even if supplemental donor hair is used to meet the weight requirement, we will match the provided lengths of each section. This ensures the finished wig reflects your natural hair distribution and layering.
A simple labeling system works well. Include a card with a head diagram indicating the section, or write directly on a tag attached to each bundle.
Prep Protocol Before Cutting
Wash your hair with a clarifying shampoo to remove product buildup, oils, and silicone residue. Skip conditioner on the final wash to ensure the hair is clean and ready for long-term storage.
The hair must be completely dry before cutting and packaging. Moisture leads to mildew, odor, and degradation. If your hair takes a long time to air dry, a low-heat blow dry is acceptable.

How to Make the Cut
Cut straight across at the base, just below the highest rubber band (the one closest to the scalp). This preserves maximum usable length and keeps the root ends clearly identified.
If you are buzz cutting or shaving your head completely, you can use clippers to cut the secured ponytails at the scalp. This preserves the maximum hair length possible, which is especially valuable for those preparing for chemotherapy or other medical treatments.
If you are cutting your hair by choice to donate as a wonderful gesture, use scissors and secure the hair with multiple bands spaced 2 to 3 inches apart along the length of each ponytail. This keeps the hair organized and maintains cuticle direction from root to tip.
A professional stylist can perform the cut as long as they follow the sectioning and securing protocol. Having the cut done at a wig facility is not necessary. Upon ordering your custom hair system, we will send detailed instructions and a preparation kit directly to your stylist.
Expect Some Length Loss
The hand-tying process used in custom wig construction consumes 2 to 3 inches of hair. An 18-inch donation will result in a finished length of approximately 15 to 16 inches. Factor this into your planning if you have a target length in mind.
Storage for Long-Term Preservation
If you plan to combine multiple harvests over time, proper storage is essential.
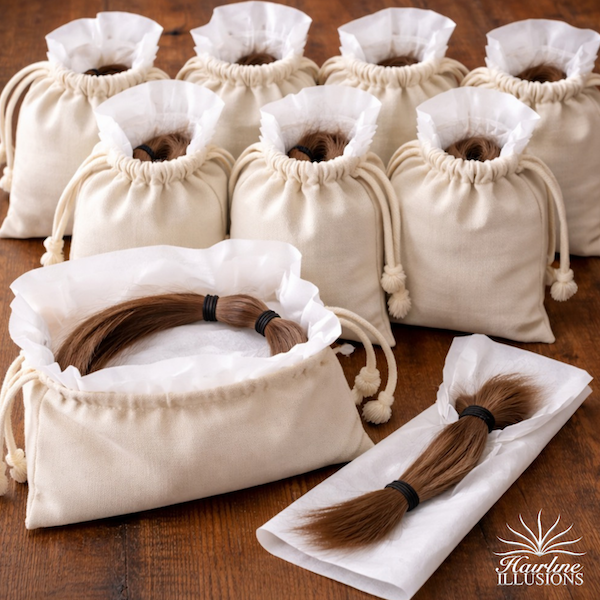
Wrap each ponytail in tissue paper and place it in a breathable cotton bag. Store in a cool, dry, dark location. Avoid airtight plastic bags, as trapped moisture can cause degradation.
Properly stored hair can last several years. Check periodically to ensure it remains dry and pliable.
Planning for Multiple Harvests
If your goal is a full, high-density wig made entirely from your own hair, you may need to plan for two growth cycles. A wig maker can weigh your first harvest and advise whether a second cut is needed or if supplemental hair can fill the gap.
Combining harvests is common and does not compromise the final result, as long as both batches are stored correctly and matched for color and texture.
Final Thoughts
Creating a wig from your own hair is a deeply personal project. The quality of the finished piece depends largely on how the hair is prepared, cut, and stored before construction begins.
Take the time to section properly, label clearly, and store carefully. These small steps make a significant difference in the wig your hair becomes.
If you are considering a custom wig from your own hair, consult with a specialist who can guide you through the process and assess your specific needs.
We specialize in advanced custom cranial prosthetics for people experiencing hair loss. If you have questions about preparing your hair for a custom wig, we are here to help.
©2023 Egypt Lawson


Comments